Friday, October 28, 2011

Hidden Safari

This week, we completed a Hidden Safari project.  Materials for this project included materials to make red glasses (which work to see the blue colored pencil), a white sheet of paper for each student, a light blue colored pencil for each student and templates for drawing animals for the students to use as resources.  The students will also need their crayons for this project.  Before even beginning the project, each student in the class made their own hidden safari glasses.  These were made out of a red translucent material and red construction paper.  The teacher handed out a template and walked the students through making the glasses.  Once the glasses were finished, the next thing we did was practice drawing animals.  We were told to draw the animal upside down in order to worry less about what the animal looks like and more about the lines it was made up of.  After we felt confident drawing an animal, we were told to draw an animal on our white sheet of paper using the blue colored pencil.  We drew the animal upside down just like we practiced.  We were able to draw any animal that we liked, but more specifically an animal that you would see on a safari.  After we were finished drawing our animals, we were supposed to hide or camouflage our animal using warm colors.  We discussed that warm colors are red, yellow and orange.  We learned that the best way to hide our safari animals was to use layers of patterns in order to distract the eye away from the blue.  We were then told to talk to our neighbors while putting on our glasses and seeing if we could guess what the hidden safari animal was.  Once we felt that the animal was hidden well enough, we put a sheet of construction paper on the back as a border and made sure we signed our name.


An extension activity that a teacher could do with this project is to take their students on a virtual safari.  The teacher could find pictures and videos of actual safari animals and then show them to their students.  The students would check out the safari animals and when the virtual safari was finished, they would fill out a worksheet on the different animals that they saw.  This could correspond with a science lesson on different kinds of animals and if they are mammals, amphibians, reptiles, or other types of animals.  It would be fun and would help the students classify animals into their groups.

Thursday, October 20, 2011

Eric Carle Inspired Collages

We created Eric Carle inspired collages which consisted of a two-page storybook layout based on the artwork of Eric Carle.  In order to make this project, we needed paste papers, 12x18 construction paper, glue stick, scissors, pencil, and scratch paper.  The first step in making the collages was to create the paste papers which we would use to create our characters.  We took sheets of white paper and used paints mixed with paste to create a thicker, colored paper.  Although Eric Carle uses painted tissue paper, we used paste paper becasue it is sturdier and easier to cut.  We were able to create any colors or designs that we wanted on the paste paper.  The wet paste papers were then left for about a week to dry.  The next step was to create a scene for your storybook which included a character, most likely an animal like Eric Carle used.  We drew this scene on a piece of 12x18 scratch paper (landscape).  The next step in creating the collages was to select the paste papers we wanted to use.  Once the paste papers to be used were decided, we drew the shapes of the characters on the paste paper we wanted them to be.  Then we cut them all out before gluing them to the construction paper.  Once we had all the pieces cut out of paste paper that we were using for our storybook, we glued them down, where we wanted them, on a 12x18 sheet of construction paper just like our drawing.  Last, we added any text that we wanted to the storybook.


An extension activity we could use with this assignment would be to have the students create a full storybook.  They would have to write the storyline and create a 6-10 page book and then share it with the class.  This would incorporate Language Arts and Art.  Although it would take a long period of time, the students would benefit because it would be much more fun than just writing a paragraph during Language Arts.  They could use their creativity in both writing and art.

Wednesday, October 12, 2011

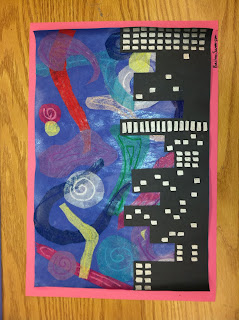
Tissue Collage

The Tissue Collage project is another activity that can be done when learning about Vincent Van Gogh.  Like the previous project, this activity starts out by watching a video about Van Gogh and his art work, focusing on "Starry Night".  Once the students have an idea of what "Starry Night" looks like, they are going to make their own out of tissue paper and a glue-water mixture that keeps the tissue paper on the large sheet of construction paper.  First, the students are to cut out different shapes, like Van Gogh used, out of colorful tissue paper.  Next the students will glue the tissue paper pieces to a piece of 12" x 18" construction paper of any color.  They are to make designs that give a feeling of the sky in the background of Van Gogh's "Starry Night".  Once the tissue paper has dried as the background, have the students add design to their background with oil pastels in whatever way they would like. The students will then cut out a city-scape to glue to the bottom of their collage to represent the modern city, compared to Van Gogh's village in "Starry Night".  The student can then be creative in putting windows or designs on the buildings with silver sharpie markers.


An extension activity that a teacher could use with this project would be to have the students create a project just like this, but using watercolor paints to create the background.  They could use blending techniques and mixing colors in order to create the swirls in the sky like they did with the tissue paper.  Also, instead of a city-scape, students could put any type of silhouette in the foreground of their picture.  This project would still be following Van Gogh, but give the students more freedom and creative space.

Van Gogh Fingerpainting

The Van Gogh finger painting project was a really fun activity that I could see early elementary school students enjoying.  We started out the activity by watching a video on Vincent Van Gogh.  The video talked about his life and his artwork, especially his painting "Starry Night".  After the video, the students were to pick up a sheet of white paper (12"x18") and tape it down to their desks.  For younger students, you could prepare this activity ahead of time and have this already done and ready for the students.  The students were then told that they should make their own Vincent Van Gogh inspired painting.  The teacher should tell the students that they will need to have something in the background, middle ground, and foreground of their painting.  Next, the students are to get their paint (red, yellow, blue, white and black) and that they were going to use their fingers in order to create the effect that Van Gogh had in his paintings.  The students would be working on making the painting flow together like Van Gogh's, but also working on mixing colors on their paper.


An extension activity that the students could do with this project would be to to have the students write about Vincent Van Gogh and his life, in order to incorporate Language Arts.  The students could take what they learned in the video and do one of three writing ideas: (a) create an obituary for Vincent Van Gogh, (b) design a newspaper article that interviews Van Gogh, or (c) get in a group and act out Vincent Van Gogh's life (a short preview).  For  younger students, this activity would probably be very short and to the point.  For older students, they would have to do more research on Vincent Van Gogh and come up with more information about him and his art than the video offered.